
DIY Cell Phone Detector Circuit: Stop Unauthorized Mobile Phone Usage
Introduction
Are you tired of people using their phones when they’re not supposed to? Maybe you want to ensure that exam halls, meetings, or other restricted areas remain phone-free. We’ve got just the solution for you – a DIY Cell Phone Detector Circuit! In this blog, we’ll walk you through the process of building a simple yet effective circuit that can detect the presence of activated cell phones within a one-meter range. It’s a fun and educational project that can help you enforce no-phone zones.
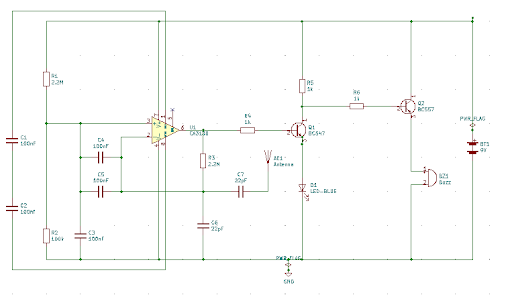
Circuit Diagram
Working Principle of Cell Phone Detector Circuit
This cell phone detector circuit works by sensing the radio frequency (RF) signals emitted by activated mobile phones. It uses an op-amp as a Frequency Detector or Current to Voltage Converter, and when it detects a phone in operation, it triggers a LED and buzzer to indicate its presence. The circuit consists of various components, including capacitors and transistors, that help in the detection process.
Components Required
Before we dive into building the circuit, let’s gather the components you’ll need:
- Op-Amp CA3130
- 2.2M resistor (2)
- 100K resistor (1)
- 1K resistor (3)
- 100nF capacitor (4)
- 22pF capacitor (2)
- 100uF capacitor
- Breadboard
- 9 Volt Battery
- Battery Connector
- LED
- Transistor BC547
- Transistor BC557
- Connecting wires
- Buzzer
- Antenna
Working of Cell Phone Detector Circuit
Here’s how the circuit works:
- The op-amp is connected as a Frequency Detector or Current to Voltage Converter.
- Two 100nF capacitors function as loop antennas to detect RF signals.
- When a call or SMS is transmitted, these capacitors pick up the RF signal, causing fluctuations in the op-amp’s output.
- The LED, connected through an NPN transistor, blinks according to the signal’s frequency.
- A PNP transistor activates the buzzer, generating a beeping sound while the signal is present.
Advantages and Disadvantages
Before you start building the circuit, it’s essential to understand its pros and cons:
Advantages
- Fast response time.
- Low overall cost.
- Minimal power consumption.
- Requires only a few components.
Disadvantages
- Limited detecting radius.
- Cannot detect Bluetooth and 3G network frequencies.
Applications
Once your cell phone detector circuit is ready, you can use it in various scenarios where mobile phone usage needs to be restricted, including:
- Petrol pumps
- Gas stations
- Historical and religious places
- Examination halls
- Security-sensitive areas like military bases and embassies
- Hospitals
- Theatres and conference rooms
Conclusion
Building a cell phone detector circuit is a fun and educational project with practical applications. It allows you to detect unauthorized phone usage within a specific range, making it an excellent choice for enforcing no-phone zones. The circuit’s quick response time ensures that even if a phone is on silent mode, you’ll know if it’s in use. Whenever a cell phone comes within a 1.5-meter range, the LED blinks rapidly, and the buzzer sounds continuously until the signal disappears.
So, if you’re looking to prevent unauthorized mobile phone usage in specific areas, gather your components and get ready to build your DIY cell phone detector circuit!